本文最后更新于 2022年2月20日 下午
SpringBoot
为什么要用SpringBoot:
SSM配置起来太复杂,配置文件多,SpringBoot开发方便
JavaConfig
使用java类作为applicationContext.xml, 配置spring容器的纯java的方式。可以创建java对象,并注入到spring容器中
1
2
3
4
5
6
7
8
9
10
11
12
13
14
15
16
17
| @Configuration
@ImportResource(value = "classpath:applicationContext.xml")
@PropertySource("classpath:config.properties")
@ComponentScan("com.example.entity")
public class SpringConfig {
@Bean
public Student createStudent(){
Student student = new Student();
student.setId(1001);
student.setName("Azusa");
student.setAge(20);
return student;
}
}
|
一些注解
相当于applicationContext.xml
相当于applicationContext.xml 的
导入spring的xml配置文件
读取properties属性配置文件
组件扫描,根据注解的功能创建对象,给属性赋值等。
默认扫描的包: @ComponentScan所在的类所在的包和子包。
使用
1
2
3
4
5
6
| @Test
public void testMixConfig(){
ApplicationContext applicationContext = new AnnotationConfigApplicationContext(SpringConfig.class);
Student student = (Student) applicationContext.getBean("student01");
System.out.println(student);
}
|
SpringBoot 开发
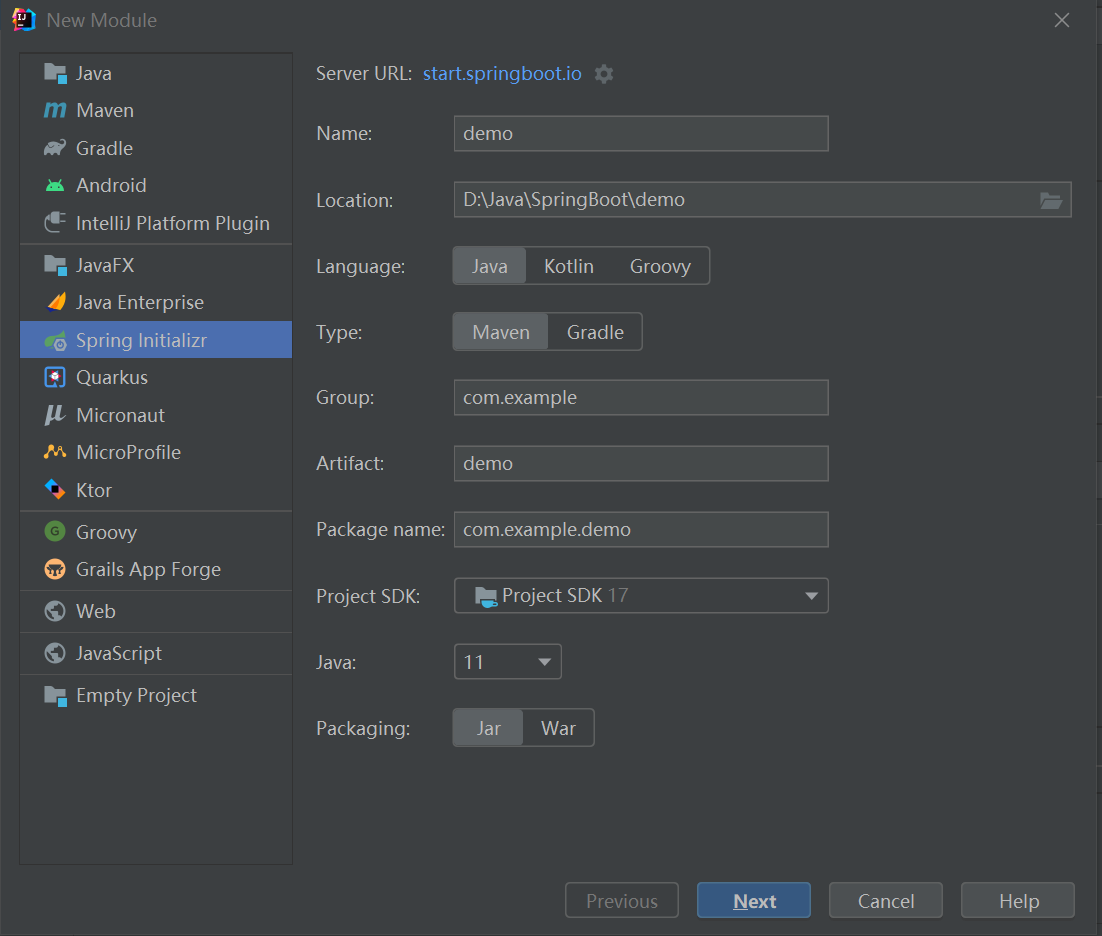
创建SpringBoot项目
- 使用spring官网的Initializer

Server URL:
- 手动创建maven项目,加入依赖
SpringBoot Demo
入口@SpringBootApplication
1
2
3
4
5
6
7
8
| @SpringBootApplication
public class Application {
public static void main(String[] args) {
SpringApplication.run(Application.class, args);
}
}
|
其中@SpringBootApplication注解内包括了den
1
2
3
4
5
6
7
8
9
10
| @SpringBootConfiguration
@EnableAutoConfiguration
@ComponentScan(
excludeFilters = {@Filter(
type = FilterType.CUSTOM,
classes = {TypeExcludeFilter.class}
), @Filter(
type = FilterType.CUSTOM,
classes = {AutoConfigurationExcludeFilter.class}
)}
|
等其他注解
@EnableAutoConfiguration注解:
自动java对象配置好,注入到spring容器中。
配置文件
application.properties或者applicaion.yml
接下来都用yml为例
1
2
3
4
5
6
7
8
9
10
11
12
13
14
| server:
port: 8082
spring:
profiles:
active: dev
student:
name: ChenXi
age: 20
email: shizurin233@gmail.com
|
其他环境,比如dev,test,都以applicaion-{}.yml为文件名。
读取配置文件:
- 使用@Value注解
例如访问上面的数据:
1
2
3
4
5
6
7
8
| @Value("${student.name}")
private String name;
@Value("${student.age}")
private Integer age;
@Value("${student.email}")
private String email;
|
- 使用@ConfigurationProperties注解接收对象
1
2
3
4
5
6
7
8
9
| @Data
@Component
@ConfigurationProperties(prefix = "student")
public class Student {
private String name;
private Integer age;
private String email;
}
|
使用JSP
不推荐SpringBoot使用JSP
加入JSP依赖:
1
2
3
4
| <dependency>
<groupId>org.apache.tomcat.embed</groupId>
<artifactId>tomcat-embed-jasper</artifactId>
</dependency>
|
加入Servelet相关依赖:
1
2
3
4
5
6
7
8
9
10
11
12
13
14
15
| <dependency>
<groupId>javax.servlet</groupId>
<artifactId>jstl</artifactId>
</dependency>
<dependency>
<groupId>javax.servlet</groupId>
<artifactId>javax.servlet-api</artifactId>
</dependency>
<dependency>
<groupId>javax.servlet.jsp</groupId>
<artifactId>javax.servlet.jsp-api</artifactId>
<version>2.3.1</version>
</dependency>
|
pom.xml中配置JSP编译:
1
2
3
4
5
6
7
8
9
10
|
<resources>
<resource>
<directory>src/main/webapp</directory>
<targetPath>META-INF/resources</targetPath>
<includes>
<include>**/*.*</include>
</includes>
</resource>
</resources>
|
application.yml中配置视图解析器:
1
2
3
4
5
| spring:
mvc:
view:
prefix: /
suffix: .jsp
|
从容器中获取对象:
1
2
3
4
5
6
| @SpringBootApplication
public class Application implements CommandLineRunner {
public static void main(String[] args) {
ConfigurableApplicationContext ctx = SpringApplication.run(Application.class, args);
SomeService service = (SomeService) ctx.getBean("someService");
}
|
1
2
3
4
5
6
| @Override
public void run(String... args) throws Exception {
System.out.println("输出, 在容器对象创建好后执行的代码");
}
|
拦截器
与SpringMVC一样,先声明拦截器
1
2
3
4
5
6
7
| public class LoginInterceptor implements HandlerInterceptor {
@Override
public boolean preHandle(HttpServletRequest request, HttpServletResponse response, Object handler) throws Exception {
System.out.println("preHandle()");
return true;
}
}
|
在配置类中注册拦截器:
1
2
3
4
5
6
7
8
9
10
11
| @Configuration
public class SpringConfig implements WebMvcConfigurer {
@Override
public void addInterceptors(InterceptorRegistry registry) {
String[] path = {"/user/**"};
String[] excludePath = {"/user/login"};
registry.addInterceptor(new LoginInterceptor())
.addPathPatterns(path)
.excludePathPatterns(excludePath);
}
}
|
使用Servlet
先创建一个Servelet对象
1
2
3
4
5
6
7
8
9
10
11
12
13
| public class SpringServlet extends HttpServlet {
@Override
protected void doGet(HttpServletRequest req, HttpServletResponse resp) throws ServletException, IOException {
doPost(req,resp);
}
@Override
protected void doPost(HttpServletRequest req, HttpServletResponse resp) throws ServletException, IOException {
resp.setContentType("text/html;charset=utf-8");
PrintWriter out = resp.getWriter();
out.println("使用 Servlet 对象");
out.flush();
out.close();
}
|
在配置类中注册Servlet:
1
2
3
4
5
6
7
8
9
10
11
12
| @Configuration
public class ServletConfig {
@Bean
public ServletRegistrationBean servletRegistrationBean(){
ServletRegistrationBean reg = new ServletRegistrationBean(new SpringServlet(), "/loginServlet");
return reg;
}
}
|
使用过滤器
处理请求, 对请求的参数, 属性进行调整。 常常在过滤器中处理字符编码。
声明过滤器类:
1
2
3
4
5
6
7
| public class SpringFilter implements Filter {
@Override
public void doFilter(ServletRequest servletRequest, ServletResponse servletResponse, FilterChain filterChain) throws IOException, ServletException {
System.out.println("doFilter..");
filterChain.doFilter(servletRequest, servletResponse);
}
}
|
配置类中注册过滤器:
1
2
3
4
5
6
7
8
9
10
11
| @Configuration
public class FilterConfig {
@Bean
public FilterRegistrationBean filterRegistrationBean(){
FilterRegistrationBean bean = new FilterRegistrationBean();
bean.setFilter(new SpringFilter());
bean.addUrlPatterns("/user/*");
return bean;
}
}
|
使用字符集过滤器
servlet类:
1
2
3
4
5
6
7
8
9
10
| public class SpringServlet extends HttpServlet {
@Override
protected void doGet(HttpServletRequest req, HttpServletResponse resp) throws ServletException, IOException {
resp.setContentType("text/html");
PrintWriter out = resp.getWriter();
out.println("测试中文");
out.flush();
out.close();
}
}
|
servlet注册:
1
2
3
4
5
6
7
8
| @Configuration
public class ServletConfig {
@Bean
public ServletRegistrationBean servletRegistrationBean(){
ServletRegistrationBean reg = new ServletRegistrationBean(new SpringServlet(), "/info");
return reg;
}
}
|
使用spring的字符集filter:
1
2
3
4
5
6
7
8
9
10
11
12
13
14
15
| @Configuration
public class FilterConfig {
@Bean
public FilterRegistrationBean filterRegistrationBean(){
FilterRegistrationBean reg = new FilterRegistrationBean();
CharacterEncodingFilter filter = new CharacterEncodingFilter();
filter.setEncoding("utf-8");
filter.setForceEncoding(true);
reg.setFilter(filter);
reg.addUrlPatterns("/*");
return reg;
}
}
|
设置applicaion.properties:
1
| server.servlet.encoding.enabled=false
|
使用配置设置编码
直接在application.properties中设置这两句
1
2
| server.servlet.encoding.charset=UTF-8
server.servlet.encoding.force=true
|
