本文最后更新于 2022年2月17日 下午
Spring MVC
MVC(Model View Controller)结构,用于网页开发
注解开发
依赖:
1
2
3
4
5
6
7
8
9
10
11
12
13
14
15
16
17
18
19
20
21
22
23
| <dependency>
<groupId>javax.servlet</groupId>
<artifactId>javax.servlet-api</artifactId>
<version>3.1.0</version>
<scope>provided</scope>
</dependency>
<dependency>
<groupId>org.springframework</groupId>
<artifactId>spring-webmvc</artifactId>
<version>5.2.19.RELEASE</version>
</dependency>
<dependency>
<groupId>com.fasterxml.jackson.core</groupId>
<artifactId>jackson-core</artifactId>
<version>2.9.0</version>
</dependency>
<dependency>
<groupId>com.fasterxml.jackson.core</groupId>
<artifactId>jackson-databind</artifactId>
<version>2.9.0</version>
</dependency>
|
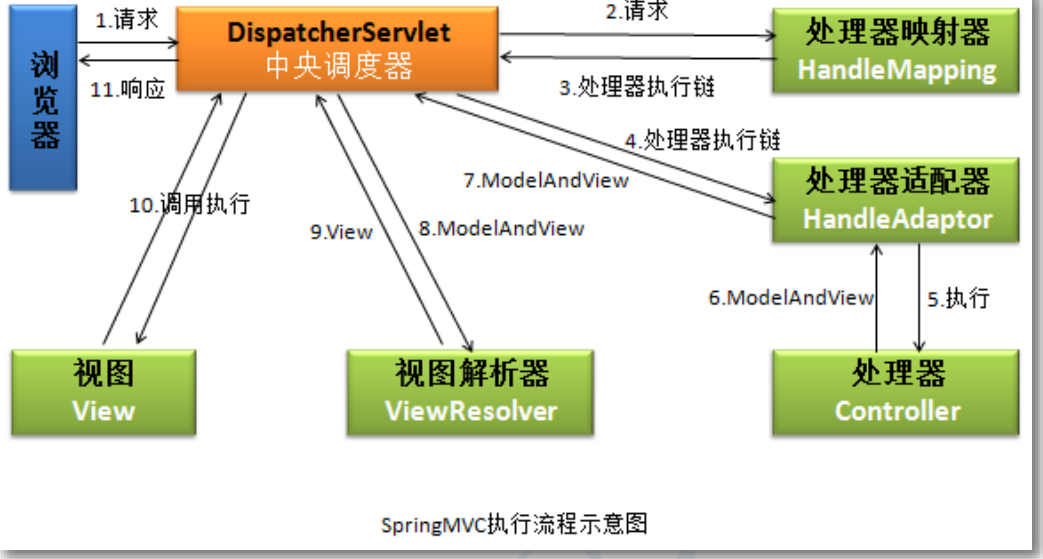
MVC执行流程:

文件配置
/webapp/WEB-INF/web.xml
1
2
3
4
5
6
7
8
9
10
11
12
13
14
15
16
17
18
19
20
21
22
23
24
25
26
27
28
29
30
31
32
33
34
35
36
37
38
39
40
41
42
43
44
45
46
47
| <?xml version="1.0" encoding="UTF-8"?>
<web-app xmlns="http://xmlns.jcp.org/xml/ns/javaee"
xmlns:xsi="http://www.w3.org/2001/XMLSchema-instance"
xsi:schemaLocation="http://xmlns.jcp.org/xml/ns/javaee http://xmlns.jcp.org/xml/ns/javaee/web-app_4_0.xsd"
version="4.0">
<servlet>
<servlet-name>springMVC</servlet-name>
<servlet-class>org.springframework.web.servlet.DispatcherServlet</servlet-class>
<init-param>
<param-name>contextConfigLocation</param-name>
<param-value>classpath:springmvc.xml</param-value>
</init-param>
<load-on-startup>1</load-on-startup>
</servlet>
<servlet-mapping>
<servlet-name>springMVC</servlet-name>
<url-pattern>/</url-pattern>
</servlet-mapping>
<filter>
<filter-name>characterEncodingFilter</filter-name>
<filter-class>org.springframework.web.filter.CharacterEncodingFilter</filter-class>
<init-param>
<param-name>encoding</param-name>
<param-value>utf-8</param-value>
</init-param>
<init-param>
<param-name>forceRequestEncoding</param-name>
<param-value>true</param-value>
</init-param>
<init-param>
<param-name>forceResponseEncoding</param-name>
<param-value>true</param-value>
</init-param>
</filter>
<filter-mapping>
<filter-name>characterEncodingFilter</filter-name>
<url-pattern>/*</url-pattern>
</filter-mapping>
</web-app>
|
Spring的applicationContext.xml配置:
1
2
3
4
5
6
7
8
9
10
11
12
13
14
15
16
17
18
19
20
21
22
23
24
25
26
| <?xml version="1.0" encoding="UTF-8"?>
<beans xmlns="http://www.springframework.org/schema/beans"
xmlns:xsi="http://www.w3.org/2001/XMLSchema-instance"
xmlns:context="http://www.springframework.org/schema/context"
xmlns:mvc="http://www.springframework.org/schema/mvc"
xsi:schemaLocation="http://www.springframework.org/schema/beans http://www.springframework.org/schema/beans/spring-beans.xsd http://www.springframework.org/schema/context https://www.springframework.org/schema/context/spring-context.xsd http://www.springframework.org/schema/mvc https://www.springframework.org/schema/mvc/spring-mvc.xsd">
<context:component-scan base-package="com.example.controller"/>
<bean class="org.springframework.web.servlet.view.InternalResourceViewResolver">
<property name="prefix" value="/WEB-INF/view/"/>
<property name="suffix" value=".jsp"/>
</bean>
<mvc:annotation-driven/>
<mvc:resources mapping="/images/**" location="/images/"/>
<mvc:resources mapping="/js/**" location="/js/"/>
</beans>
|
相关注解
在控制类上声明@Controller注解,在相关方法上加上@RequestMapping注解
@RequestMapping:将请求和处理请求的控制器方法关联起来,建立映射关系。
1
2
3
4
5
6
7
8
9
10
11
12
13
14
15
16
17
18
19
20
21
22
23
24
25
26
27
28
29
30
31
32
33
34
| @Controller
@RequestMapping("/test")
public class SomeController {
@RequestMapping(value = "/someService.do", method = RequestMethod.GET)
public ModelAndView doSomeService() {
ModelAndView mv = new ModelAndView();
mv.addObject("msg", "Hello SpringMVC");
mv.setViewName("show");
return mv;
}
@RequestMapping(value = "/postTest.do")
public ModelAndView doTestPost() {
ModelAndView mv = new ModelAndView();
mv.addObject("msg", "Post Test");
mv.setViewName("test");
return mv;
}
@RequestMapping(value = "/getParam.do")
public ModelAndView doGetParam(HttpServletRequest request, HttpServletResponse response, HttpSession session) {
ModelAndView mv = new ModelAndView();
mv.addObject("msg", "Parameter is:" + request.getParameter("name"));
mv.setViewName("show");
return mv;
}
}
|
其中,请求方法中可以添加HttpServletRequest request, HttpServletResponse response, HttpSession session参数,可以获取一些参数。
请求方法的参数
jsp:
1
2
3
4
5
6
7
8
|
<form action="test2/postParam.do" method="post">
Name: <input type="text" name="name">
<br>
Age: <input type="text" name="age">
<br>
<input type="submit" value="Post These Param">
</form>
|
请求方法:
1
2
3
4
5
6
7
8
| @RequestMapping(value = "/postParam.do", method = RequestMethod.POST)
public ModelAndView doPostParam(String name, Integer age) {
ModelAndView mv = new ModelAndView();
mv.addObject("userName", name);
mv.addObject("userAge", age);
mv.setViewName("show2");
return mv;
}
|
返回视图:
1
2
3
4
5
| <body>
<h3>WEB-INF/view/show2.jsp</h3>
<h3>Name: ${userName}</h3>
<h3>Age: ${userAge}</h3>
</body>
|
jsp:
1
2
3
4
5
6
7
| <form action="test2/postParam2.do" method="post">
Name: <input type="text" name="uname">
<br>
Age: <input type="text" name="uage">
<br>
<input type="submit" value="Post These Param">
</form>
|
请求方法:
使用@RequestParam注解校正参数名,能够正常获取
1
2
3
4
5
6
7
8
9
10
|
@RequestMapping(value = "/postParam2.do", method = RequestMethod.POST)
public ModelAndView doReceiveParam(@RequestParam(value = "uname",required = false) String name, //required = true (default) 必须传参
@RequestParam(value = "uage", required = false) Integer age) {
ModelAndView mv = new ModelAndView();
mv.addObject("userName", name);
mv.addObject("userAge", age);
mv.setViewName("show2");
return mv;
}
|
jsp:
1
2
3
4
5
6
7
| <form action="test2/postParam3.do" method="post">
Name: <input type="text" name="name">
<br>
Age: <input type="text" name="age">
<br>
<input type="submit" value="Post These Param">
</form>
|
请求方法:
1
2
3
4
5
6
7
8
9
| @RequestMapping(value = "/postParam3.do", method = RequestMethod.POST)
public ModelAndView doReceiveObject(Student student) {
ModelAndView mv = new ModelAndView();
mv.addObject("userName", student.getName());
mv.addObject("userAge", student.getAge());
mv.addObject("student", student);
mv.setViewName("show3");
return mv;
}
|
Controller返回String
只返回视图,如果需要传参就要HttpServletRequest request,并设置request的参数
1
2
3
4
5
6
| @RequestMapping(value = "/returnString.do", method = RequestMethod.POST)
public String doReturnStringView(HttpServletRequest request, String name, Integer age) {
request.setAttribute("userName", name);
request.setAttribute("userAge", age);
return "show2";
}
|
Controller返回Void
若处理器对请求处理后,无需跳转到其它任何资源,此时可以让处理器方法返回 void。例如AJAX。
1
2
3
4
5
6
7
8
9
10
11
12
13
14
15
16
17
18
| @RequestMapping(value = "/returnVoid.do")
public void doReturnVoid(HttpServletResponse response, String name, Integer age) throws IOException {
Student student = new Student();
student.setName(name);
student.setAge(age);
String json = "";
if (student != null) {
ObjectMapper om = new ObjectMapper();
json = om.writeValueAsString(student);
System.out.println(json);
}
PrintWriter pw = response.getWriter();
pw.println(json);
pw.flush();
pw.close();
}
|
把获取的数据转换成json对象,使用ajax输出
1
2
3
4
5
6
7
8
9
10
11
12
13
14
15
16
17
18
19
| <script type="text/javascript">
$(function () {
$("#btn").click(function () {
$.ajax({
url: "test3/returnVoid.do",
data: {
name: "Azusa",
age: "15"
},
type: "post",
dataType: "json",
success: function (resp) {
alert("resp: " + resp.name + " " + resp.age);
}
})
})
})
</script>
|
也可以直接返回String,用AJAX显示
1
2
3
4
5
| @ResponseBody
@RequestMapping(value = "/returnOnlyString.do", produces = "text/plain;charset=utf-8")
public String doStringData(String name, Integer age) {
return "Hello String";
}
|
jsp:
1
2
3
4
5
6
7
8
9
10
11
12
13
14
15
16
17
18
| <script type="text/javascript">
$(function () {
$("#btn2").click(function () {
$.ajax({
url: "test3/returnOnlyString.do",
data: {
name: "Azusa",
age: "15"
},
type: "post",
success: function (resp) {
alert("resp: " + resp);
}
})
})
})
</script>
|
Controller返回对象
需要使用@ResponseBody注解:
1
2
3
4
5
6
7
8
| @ResponseBody
@RequestMapping(value = "/returnStudentJson.do")
public Student doReturnStudent(String name, Integer age) {
Student student = new Student();
student.setName(name);
student.setAge(age);
return student;
}
|
1
2
3
4
5
6
7
8
9
10
11
12
13
14
15
| @ResponseBody
@RequestMapping(value = "/returnJsonArray.do")
public List<Student> doStudentJsonArray(String name, Integer age) {
List<Student> list = new ArrayList<>();
Student student = new Student();
student.setName(name);
student.setAge(age);
list.add(student);
student = new Student();
student.setName("ChenXi");
student.setAge(22);
list.add(student);
return list;
}
|
静态资源访问
当在web.xml中<url-pattern>/</url-pattern>后,web所有的请求,包括静态资源的访问都交给DispatcherServlet处理,然而DispatcherServlet并不能处理静态资源。故需要配置静态资源的访问,参考上面的文件配置的springmvc.xml。
整合SSM开发
在上面的基础上增加监听器,目的:
1
2
3
4
5
6
| WebApplicationContext webApplicationContext = null;
String key = WebApplicationContext.ROOT_WEB_APPLICATION_CONTEXT_ATTRIBUTE;
Object attribute = getServletContext().getAttribute(key);
if (attribute != null)
webApplicationContext = (WebApplicationContext) attribute;
|
- 使用WebApplicationContextUtils获取容器对象
1
2
3
4
5
6
7
8
9
10
11
12
13
| WebApplicationContext webApplicationContext = null;
ServletContext sc = getServletContext();
webApplicationContext = WebApplicationContextUtils.getWebApplicationContext(sc);
System.out.println("Container Info: " + webApplicationContext);
StudentService studentService = (StudentService) webApplicationContext.getBean("studentService");
Student student = new Student();
student.setId(Integer.parseInt(id));
student.setName(name);
student.setEmail(email);
student.setAge(Integer.parseInt(age));
studentService.addStudent(student);
|
在web.xml中配置监听器:
1
2
3
4
5
6
7
8
9
|
<context-param>
<param-name>contextConfigLocation</param-name>
<param-value>classpath:conf/applicationContext.xml</param-value>
</context-param>
<listener>
<listener-class>org.springframework.web.context.ContextLoaderListener</listener-class>
</listener>
|
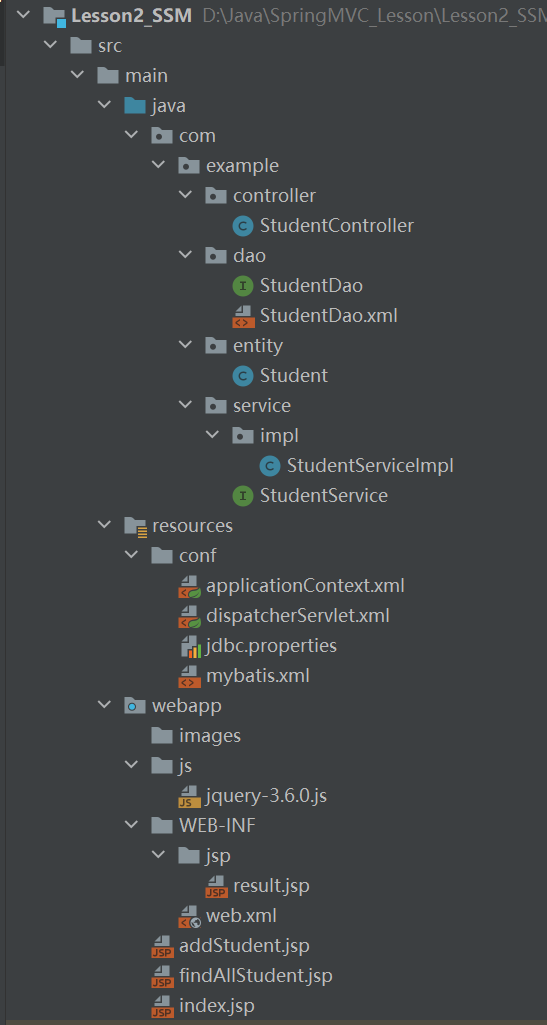
目录结构如下:

主要是Controller的编写:
1
2
3
4
5
6
7
8
9
10
11
12
13
14
15
16
17
18
19
20
21
22
23
24
25
26
| @RequestMapping("/student")
@Controller
public class StudentController {
@Resource
private StudentService service;
@RequestMapping("/addStudent.do")
public ModelAndView addStudent(Student student) {
ModelAndView mv = new ModelAndView();
String msg = "Register Failure!";
int res = service.addStudent(student);
if (res > 0)
msg = "Student [" + student.getName() + " ]Register Successful!";
mv.addObject("msg", msg);
mv.setViewName("result");
return mv;
}
@RequestMapping("listStudents.do")
@ResponseBody
public List<Student> listStudents(){
List<Student> studentList = service.findAllStudent();
return studentList;
}
}
|
在所有jsp上面加上:
1
2
3
4
5
6
| <%
String basePath = request.getScheme() + "://" +
request.getServerName() + ":" + request.getServerPort() +
request.getContextPath() + "/";
%>
|
1
2
3
|
```jsp
<base href="<%=basePath%>">
|
用来正确处理路径相关问题
查询jsp中AJAX编写与上面类似
1
2
3
4
5
6
7
8
9
10
11
12
13
14
15
16
17
18
19
20
21
22
23
24
25
26
27
28
29
30
31
32
33
34
35
36
37
38
39
40
41
42
43
44
45
46
47
48
49
50
51
52
53
54
55
56
57
58
| <%@ page contentType="text/html;charset=UTF-8" language="java" %>
<%
String basePath = request.getScheme() + "://" +
request.getServerName() + ":" + request.getServerPort() +
request.getContextPath() + "/";
%>
<html>
<head>
<title>Find Students</title>
<base href="<%=basePath%>">
<script type="text/javascript" src="js/jquery-3.6.0.js"></script>
<script type="text/javascript">
$(function (){
loadStudentData();
$("#btn").click(function (){
loadStudentData()
})
})
function loadStudentData(){
$.ajax({
url:"student/listStudents.do",
type:"get",
dataType:"json",
success:function (data){
$("#info").html("");
$.each(data, function (i,n){
$("#info").append("<tr>")
.append("<td>"+n.id+"</td>")
.append("<td>"+n.name+"</td>")
.append("<td>"+n.age+"</td>")
.append("</tr>")
})
}
})
}
</script>
</head>
<body>
<div align="center">
<h1>Students: </h1>
<table>
<thead>
<tr>
<td>ID</td>
<td>Name</td>
<td>Age</td>
</tr>
</thead>
<tbody id="info">
</tbody>
</table>
<input type="button" id="btn" value="Load Data">
</div>
</body>
</html>
|
其他技术
转发和重定向
转发:一个请求一个相应
转发:两个请求两个相应,故不能传参数
Controller:
1
2
3
4
5
6
7
8
9
10
11
12
13
14
15
16
17
| @RequestMapping(value = "/testForward.do")
public ModelAndView doForward() {
ModelAndView mv = new ModelAndView();
mv.addObject("msg", "Hello SpringMVC");
mv.setViewName("forward:/WEB-INF/view/show.jsp");
return mv;
}
@RequestMapping(value = "/testRedirect.do")
public ModelAndView doRedirect() {
ModelAndView mv = new ModelAndView();
mv.addObject("msg", "Hello SpringMVC");
mv.setViewName("redirect:/show.jsp");
return mv;
}
|
异常处理
控制器增强器,在类上声明,方法使用@ExceptionHandler,value=异常.class
GlobalExceptionHandler:
1
2
3
4
5
6
7
8
9
10
11
12
13
14
15
16
17
18
19
20
21
22
23
24
25
26
27
28
29
30
31
32
33
| @ControllerAdvice
public class GlobalExceptionHandler {
@ExceptionHandler(value = NameException.class)
public ModelAndView doNameException(Exception e){
ModelAndView mv = new ModelAndView();
mv.addObject("msg", "Name Not Correct!!!");
mv.addObject("e", e);
mv.setViewName("nameError");
return mv;
}
@ExceptionHandler(value = AgeException.class)
public ModelAndView doAgeeException(Exception e){
ModelAndView mv = new ModelAndView();
mv.addObject("msg", "Age Illegal !!!");
mv.addObject("e", e);
mv.setViewName("ageError");
return mv;
}
@ExceptionHandler
public ModelAndView doOtherException(Exception e){
ModelAndView mv = new ModelAndView();
mv.addObject("msg", "Other Error Encounter !!!");
mv.addObject("e", e);
mv.setViewName("defaultError");
return mv;
}
}
|
当使用@RequestMapping 注解修饰的方法抛出异常时,会执行@ControllerAdvice 修饰的
类中的异常处理方法。
Controller:
1
2
3
4
5
6
7
8
9
10
11
12
13
14
15
16
17
18
| @RequestMapping(value = "/testException.do")
public ModelAndView doException(String name, Integer age) throws UserException {
ModelAndView mv = new ModelAndView();
if(!"Azusa".equals(name)){
throw new NameException("Name Error");
}
if(age==null || age<0){
throw new AgeException("Age Error");
}
mv.addObject("name", name);
mv.addObject("age", age);
mv.setViewName("show2");
return mv;
}
|
拦截器
拦截指定请求,作用:处理权限验证等
在Spring配置文件中配置拦截器:
1
2
3
4
5
6
| <mvc:interceptors>
<mvc:interceptor>
<mvc:mapping path="/**"/>
<bean class="com.example.handler.InterceptorHandler"/>
</mvc:interceptor>
</mvc:interceptors>
|
IntereptorHandler实现HandlerInterceptor:
1
2
3
4
5
6
7
8
9
10
11
12
13
14
15
16
17
18
19
20
21
22
23
24
25
26
27
28
29
30
31
32
33
34
35
36
37
38
39
40
41
| public class InterceptorHandler implements HandlerInterceptor {
@Override
public boolean preHandle(HttpServletRequest request, HttpServletResponse response, Object handler) throws Exception {
System.out.println("preHandle()");
String loginName = "";
Object attr = request.getSession().getAttribute("name");
if (attr != null) {
loginName = (String) attr;
}
if ("azusa".equals(loginName))
return true;
request.getRequestDispatcher("/info.jsp").forward(request, response);
return false;
}
@Override
public void postHandle(HttpServletRequest request, HttpServletResponse response, Object handler, ModelAndView mv) throws Exception {
System.out.println("postHandle()");
}
@Override
public void afterCompletion(HttpServletRequest request, HttpServletResponse response, Object handler, Exception ex) throws Exception {
System.out.println("afterCompletion()");
}
}
|
在收到用户请求时,会先执行preHandle(),如果返回false,后面两个方法将不会执行。

